
YAMAHA AG03マイクの本数によって使い方が変わります|接続方法から使い方までわかりやすく解説
Zoomミーティングで使うマイクの本数によって『YAMAHA AG03』の使い方は変わってきます。
このブログではマイクの本数の違いによる『YAMAHA AG03』の接続方法、使い方をわかりやすく解説していきます。
マイクを1本使用の場合
接続方法
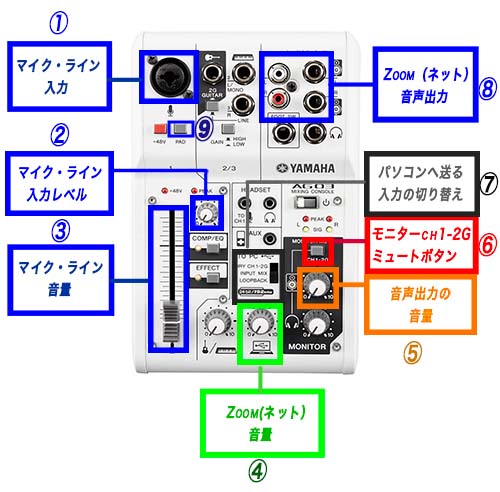
- ①にマイクを接続する
- ⑧を会場のミキサーのインプットに接続する。
- ⑨の『PAD』は上がったままにする。
- ⑥のボタンも上がったままにする。
- ⑦のスイッチを『DRY CH 1-2G』にする。
使用方法
- ③のフェーダーを上にある黒い線に合わせる。
- Zoomミーティング内の音を聴きながら②番を上げていく。
- Zoomミーティング内の音量が決まったら⑤番のボリュームを上げて会場への送りの音声を決める。
- ④のボリュームを上げてZoomミーティングから来る音の音量を決める。
以上が『YAMAHA AG-03』にマイクを1本接続した時の接続方法及び使用方法でした。
マイクが1本であればこの方法で『YAMAHA AG-03』でマイナスワンを作ることができます。
しかしマイクの本数が増えた場合別ミキサーが必要になってきます。
次はマイクの本巣が増えた場合の接続方法と使用方法を解説していきます。
マイク1本以上で別ミキサーで管理する場合
接続方法
- ①に会場ミキサーの『AUXOUT』か『GROUPOUT』からの音声を接続する。
- ⑧と会場ミキサーのインプットに接続する。
- ⑧と接続した会場ミキサーのインプットチャンネルの『AUXOUT』か『GROUPOUT』(会場のOUTを接続した場所)のボリュームを下げておく。
- 会場ミキサーのOUTがLINEレベルなので⑨のボタンを下げる。
- ⑥のボタンを下げる。
- ⑦のスイッチを『DRY CH 1-2G』にする。
会場の音響や別ミキサーを使う時の『マイナスワン』や『接続方法』については
『【超簡単】大会場にある音響ミキサーでマイナスワンを作る方法|ミキサー3個を解説』
こちらを参考にしてください。
使用方法
- 会場のミキサーで会場の音量を決める。
- ③のフェーダーを上にある黒い線に合わせる。
- Zoomミーティング内に流れている音を聴きながら②番を上げていく。
- 会場ミキサーのZoomミーティングが入ったチャンネルの音量を規定値ぐらいまで上げておく。
Zoomを入力した『AUXOUT』か『GROUPOUT』の音量は下げておく。 - ⑤のボリュームつまみを上に向くように合わせる。
- ④のボリュームを上げてZoomミーティングから来る音の音量を決める。
(小さいようなら⑤のボリュームを少し上げてみる)
今回のまとめ
『YAMAHA AG03』をZoomミーティングで使う時の使用方法を解説させていただきました。
マイク1本なら『YAMAHA AG-03』で完結するのですがマイクの本数が増えた場合、会場にある音響ミキサーを使用するなど別音響ミキサーが必要になってきます。
又、別ミキサーを使うことによって『YAMAHA AG03』の使い方も変わってきます。
今回の『YAMAHA AG03』のマイクの本数による使い方違いを解説させていただきました。
わかりやすかったでしょうか?
これからもZoomやYouTubeなどの配信系の使い方の方法やちょとした小技などわかりやすく解説していきたいと思います。
最後まで読んでいただきありがとうございました。
お問合せ
わからない事や不明な点がありましたら下のコメントからお気軽にお問合せください。
リンク